


May-2025 Linux Foundation CKA Actual Questions and Braindumps
CKA Dumps To Pass Linux Foundation Exam in 24 Hours - TestPassed
The CKA certification is recognized globally and is highly valued by organizations that use Kubernetes in their production environments. Certified Kubernetes Administrator (CKA) Program Exam certification provides IT professionals with a competitive edge in the job market and opens up new career opportunities. The Linux Foundation offers comprehensive training and preparation materials to help candidates prepare for the CKA certification exam. The training includes hands-on labs, online courses, and study materials that cover all the topics and skills required for the exam.
The CKA Program Exam is a valuable certification for IT professionals who are interested in building their knowledge of Kubernetes administration. CKA exam is recognized by many organizations and is a great way to demonstrate your competence and expertise in Kubernetes management. If you are interested in pursuing a career in container orchestration and management, the CKA exam is a great place to start.
NEW QUESTION # 42
You are deploying a microservices application on Kubernetes where each service has its own dedicated namespace. You want to implement a robust network security policy that allows communication between specific services only. How can you achieve this using NetworkPolicies?
Answer:
Explanation:
See the solution below with Step by Step Explanation.
Explanation:
Solution (Step by Step) :
1. Define Network Policies for Each Service:
- For each service, create a NetworkPolicy that defines the allowed ingress and egress traffic.
- Example for service "service-A":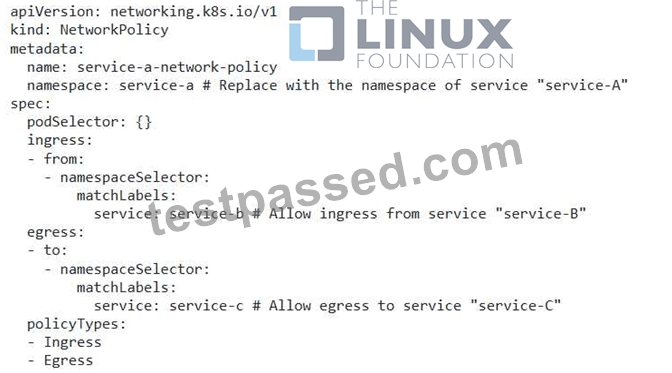
2. Apply Network Policies: - Apply the NetworkPolicies to the respective namespaces using 'kubectl apply -f networkpolicy.yaml'
NEW QUESTION # 43
Score: 4%
Task
Check to see how many nodes are ready (not including nodes tainted NoSchedule ) and write the number to
/opt/KUSC00402/kusc00402.txt
Answer:
Explanation:
See the solution below.
Explanation
Solution:
kubectl describe nodes | grep ready|wc -l
kubectl describe nodes | grep -i taint | grep -i noschedule |wc -l
echo 3 > /opt/KUSC00402/kusc00402.txt
#
kubectl get node | grep -i ready |wc -l
# taintsnoSchedule
kubectl describe nodes | grep -i taints | grep -i noschedule |wc -l
#
echo 2 > /opt/KUSC00402/kusc00402.txt
NEW QUESTION # 44
List all the pods sorted by name
Answer:
Explanation:
kubectl get pods --sort-by=.metadata.name
NEW QUESTION # 45
Delete persistent volume and persistent volume claim
Answer:
Explanation:
kubectl delete pvc task-pv-claim kubectl delete pv task-pv-volume // Verify Kubectl get pv,pvc
NEW QUESTION # 46
Allow traffic from all the pods in "web" namespace and from pods
with label "type=monitoring" to the pods matching label "app: db"
- A. kubectl create namespace web
kubectl label namespace/web app=web
vim web-allow-all-ns-monitoring.yaml
apiVersion: networking.k8s.io/v1
kind: NetworkPolicy
metadata:
name: web-allow-all-ns-monitoring
namespace: default
spec:
podSelector:
matchLabels:
app: db
ingress:
- from:
- namespaceSelector:
matchLabels:
app: web
podSelector:
matchLabels:
type: monitoring
k kubectl apply -f web-allow-all-ns-monitoring.yaml - B. kubectl create namespace web
kubectl label namespace/web app=web
vim web-allow-all-ns-monitoring.yaml
apiVersion: networking.k8s.io/v1
kind: NetworkPolicy
metadata:
name: web-allow-all-ns-monitoring
namespace: default
spec:
podSelector:
podSelector:
matchLabels:
type: monitoring
k kubectl apply -f web-allow-all-ns-monitoring.yaml
Answer: A
NEW QUESTION # 47
Score: 4%
Task
Scale the deployment presentation to 6 pods.
Answer:
Explanation:
Solution:
kubectl get deployment
kubectl scale deployment.apps/presentation --replicas=6
NEW QUESTION # 48
Configure the kubelet systemd- managed service, on the node labelled with name=wk8s-node-1, to launch a pod containing a single container of Image httpd named webtool automatically. Any spec files required should be placed in the /etc/kubernetes/manifests directory on the node.
You can ssh to the appropriate node using:
[student@node-1] $ ssh wk8s-node-1
You can assume elevated privileges on the node with the following command:
[student@wk8s-node-1] $ | sudo -i
Answer:
Explanation:
See the solution below.
Explanation
solution
F:\Work\Data Entry Work\Data Entry\20200827\CKA\21 C.JPG
F:\Work\Data Entry Work\Data Entry\20200827\CKA\21 D.JPG
F:\Work\Data Entry Work\Data Entry\20200827\CKA\21 E.JPG
F:\Work\Data Entry Work\Data Entry\20200827\CKA\21 F.JPG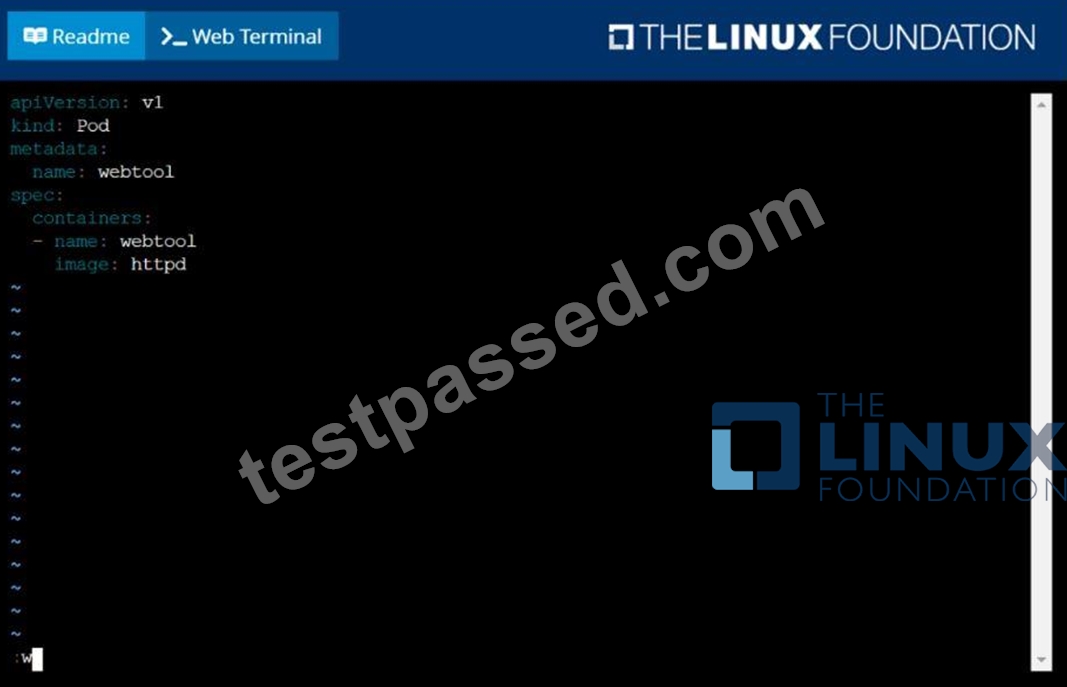
F:\Work\Data Entry Work\Data Entry\20200827\CKA\21 G.JPG
NEW QUESTION # 49
Create a namespace called 'development' and a pod with image nginx called nginx on this namespace.
Answer:
Explanation:
kubectl create namespace development
kubectl run nginx --image=nginx --restart=Never -n development
NEW QUESTION # 50
You are running a service that handles requests from multiple pods. How can you scale the service to handle increased traffic without impacting the service availability during the scaling process?
Answer:
Explanation:
See the solution below with Step by Step Explanation.
Explanation:
Solution (Step by Step) :
1. Use a Deployment:
- Deploy the service using a Deployment with the desired number of replicas.
2. Define a Service:
- Create a Service that exposes the application to the outside world.
- Use a 'type: LoadBalancer' to distribute traffic across the pods.
3. Implement Horizontal Pod Autoscaler (HPA):
- Create an HPA that monitors the service's CPU usage.
- Configure the HPA to scale the Deployment based on the CPU utilization.
4. Test the Autoscaling: - Simulate increased traffic to the service. - Observe the HPA scaling the Deployment to meet the demand. 5. Monitor the Service: - Monitor the service's performance and ensure that it remains available and stable during scaling. 6. Adjust HPA Configuration: - Fine-tune the HPA configuration to optimize scaling based on specific performance needs.
NEW QUESTION # 51
Get the number of schedulable nodes and write to a file
/opt/schedulable-nodes.txt
- A. kubectl get nodes -o jsonpath="{range
.items[*]}{.metadata.name}
{.spec.taints[?(@.effect=='NoSchedule')].effect}{\"\n\"}{end}"
| awk 'NF==11 {print $0}' > /opt/schedulable-nodes.txt
// Verify
cat /opt/schedulable-nodes.txt - B. kubectl get nodes -o jsonpath="{range
.items[*]}{.metadata.name}
{.spec.taints[?(@.effect=='NoSchedule')].effect}{\"\n\"}{end}"
| awk 'NF==1 {print $0}' > /opt/schedulable-nodes.txt
// Verify
cat /opt/schedulable-nodes.txt
Answer: B
NEW QUESTION # 52
Get list of all the pods showing name and namespace with a jsonpath expression.
Answer:
Explanation:
kubectl get pods -o=jsonpath="{.items[*]['metadata.name' , 'metadata.namespace']}"
NEW QUESTION # 53
Kubernetes. The microservices communicate with each other via a shared database. Explain how you would implement a strategy to manage persistent data in the database, ensuring availability and scalability for all microservices.
Answer:
Explanation:
See the solution below with Step by Step Explanation.
Explanation:
Solution (Step by Step) :
1. Use a Database with High Availability:
- Select a database system that supports high availability, such as MySQL with Galera or PostgreSQL with Patroni. These database systems can replicate data across multiple nodes, providing fault tolerance and scalability.
2. Deploy the Database as a StatefulSet:
- Create a StatefulSet for your database deployment, ensuring that each pod is assigned a unique name and volume claim. This will ensure that the database data is preserved even if pods are restarted or deleted.
3. Implement Persistent Volumes and Claims:
- Define PersistentVolumeClaims (PVCs) for each database node, requesting a storage class that provides the desired performance and resilience.
- Create corresponding PersistentVolumes (PVs) to back these PVCs, ensuring sufficient capacity and appropriate access modes.
4. Configure Microservice Pods to Access the Database:
- Configure each microservice pod to access the database using the StatefulSet's service name or a dedicated database service.
5. Utilize a Service Mesh:
- Consider deploying a service mesh like Istio to manage communication between microservices and the database. A service mesh provides features like load balancing, service discovery, and security, simplifying communication management.
6. Implement Monitoring and Alerting:
- Monitor the health and performance of both the database and microservices to quickly detect and resolve any issues. Configure alerts to notify you of critical events or failures.
7. Scale the Database as Needed:
- Use horizontal pod autoscaling (HPA) to automatically scale the database deployment based on its load. This ensures that the database can handle increasing traffic.
NEW QUESTION # 54
Create a daemonset named "Prometheus-monitoring" using image=prom/Prometheus which runs in all the nodes in the cluster. Verify the pod running in all the nodes
- A. vim promo-ds.yaml
apiVersion: apps/v1
kind: DaemonSet
metadata:
name: prometheus-monitoring
spec:
selector:
matchLabels:
name: prometheus
template:
metadata:
labels:
name: prometheus
spec:
tolerations:
# remove it if your masters can't run pods
- key: node-role.kubernetes.io/master
effect: NoSchedule
containers:
- name: prometheus-container
image: prom/prometheus
volumeMounts:
- name: varlog
mountPath: /var/log
- name: varlibdockercontainers
mountPath: /var/lib/docker/containers
readOnly: true
volumes:
- name: varlog
emptyDir: {}
- name: varlibdockercontainers
emptyDir: {}
kubectl apply -f promo-ds.yaml
NOTE: Deamonset will get scheduled to "default" namespace, to
schedule deamonset in specific namespace, then add
"namespace" field in metadata
//Verify
kubectl get ds
NAME DESIRED CURRENT READY UP-TO-DATE
AVAILABLE NODE SELECTOR AGE
prometheus-monitoring 6 6 0 6
0 <none> 7s
kubectl get no # To get list of nodes in the cluster
// There are 6 nodes in the cluster, so a pod gets scheduled to
each node in the cluster - B. vim promo-ds.yaml
apiVersion: apps/v1
kind: DaemonSet
metadata:
name: prometheus-monitoring
spec:
selector:
matchLabels:
name: prometheus
template:
metadata:
labels:
name: prometheus
spec:
tolerations:
# remove it if your masters can't run pods
- key: node-role.kubernetes.io/master
effect: NoSchedule
containers:
- name: prometheus-container
- name: varlibdockercontainers
mountPath: /var/lib/docker/containers
readOnly: true
volumes:
- name: varlog
emptyDir: {}
- name: varlibdockercontainers
emptyDir: {}
kubectl apply -f promo-ds.yaml
NOTE: Deamonset will get scheduled to "default" namespace, to
schedule deamonset in specific namespace, then add
"namespace" field in metadata
//Verify
kubectl get ds
NAME DESIRED CURRENT READY UP-TO-DATE
AVAILABLE NODE SELECTOR AGE
prometheus-monitoring 8 8 0 6
0 <none> 7s
kubectl get no # To get list of nodes in the cluster
// There are 6 nodes in the cluster, so a pod gets scheduled to
each node in the cluster
Answer: A
NEW QUESTION # 55
You are running a Kubernetes cluster with a large number of deployments and services. You need to improve the performance and efficiency of DNS resolution, especially during peak traffic periods.
Answer:
Explanation:
See the solution below with Step by Step Explanation.
Explanation:
Solution (Step by Step) :
1. Increase CoreDNS Resources:
- Allocate more CPU, memory, and storage resources to the CoreDNS Deployment to handle increased DNS traffic.
2. Configure CoreDNS for Efficient Caching: - Use CoreDNS's 'cache' plugin to store DNS records in memory and reduce the need for frequent DNS queries.
3. Use a Distributed DNS Server: - If you have a very large cluster with high traffic, consider using a distributed DNS server like etcd or Consul. This can help to improve performance and scalability. 4. Use DNS over TLS (DOT) or DNS over HTTPS (DoH): - Enable secure DNS communication to reduce the risk of DNS poisoning attacks, which can significantly impact performance.
5. Monitor CoreDNS Performance: - Use metrics and logs to monitor CoreDNS performance and identify potential bottlenecks. This will help you adjust your configuration and resource allocation as needed. ]
NEW QUESTION # 56
Create a persistent volume with name app-data, of capacity 2Gi and access mode ReadWriteMany. The type of volume is hostPath and its location is /srv/app-data.
Answer:
Explanation:
See the solution below.
Explanation
solution
Persistent Volume
A persistent volume is a piece of storage in a Kubernetes cluster. PersistentVolumes are a cluster-level resource like nodes, which don't belong to any namespace. It is provisioned by the administrator and has a particular file size. This way, a developer deploying their app on Kubernetes need not know the underlying infrastructure. When the developer needs a certain amount of persistent storage for their application, the system administrator configures the cluster so that they consume the PersistentVolume provisioned in an easy way.
Creating Persistent Volume
kind: PersistentVolumeapiVersion: v1metadata: name: spec: capacity: # defines the capacity of PV we are creating storage: 2Gi #the amount of storage we are tying to claim accessModes: # defines the rights of the volume we are creating - ReadWriteMany " # path to which we are creating the volume Challenge Create a Persistent Volume named ReadWriteMany, storage classname shared, 2Gi of storage capacity and the host path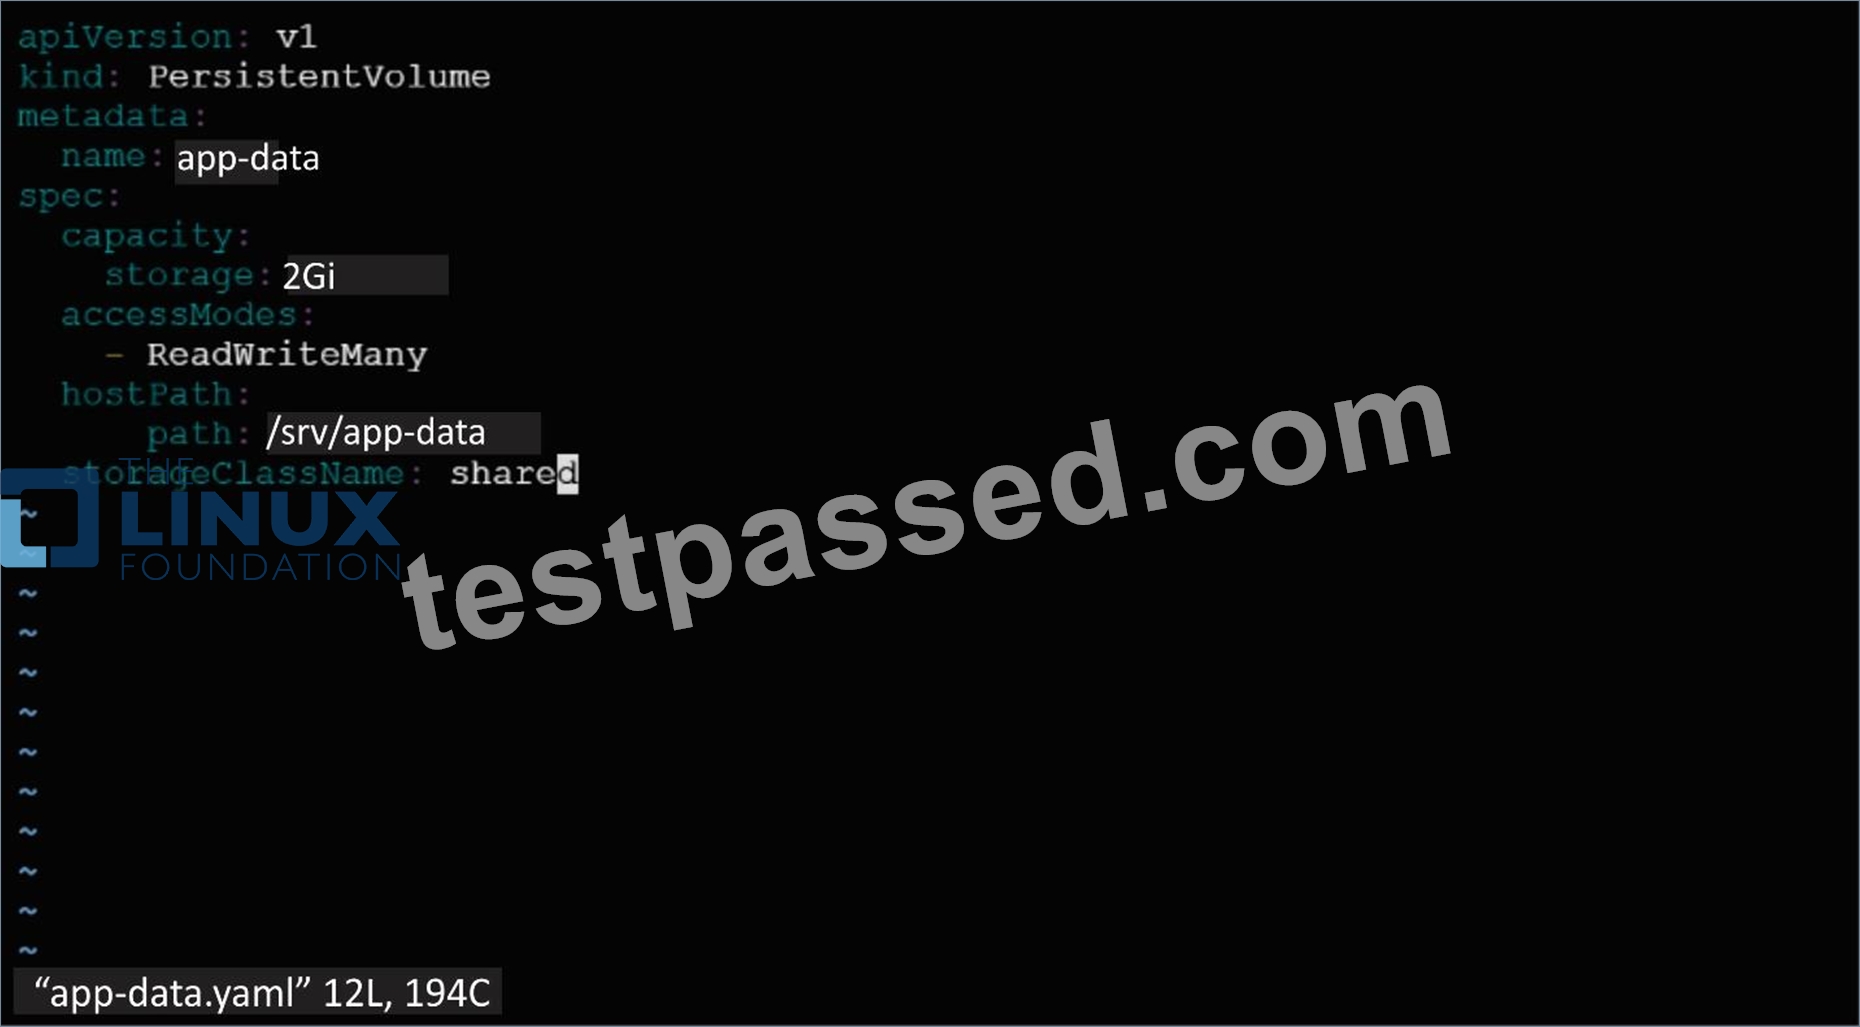
2. Save the file and create the persistent volume.
Image for post
3. View the persistent volume.
Our persistent volume status is available meaning it is available and it has not been mounted yet. This status will change when we mount the persistentVolume to a persistentVolumeClaim.
PersistentVolumeClaim
In a real ecosystem, a system admin will create the PersistentVolume then a developer will create a PersistentVolumeClaim which will be referenced in a pod. A PersistentVolumeClaim is created by specifying the minimum size and the access mode they require from the persistentVolume.
Challenge
Create a Persistent Volume Claim that requests the Persistent Volume we had created above. The claim should request 2Gi. Ensure that the Persistent Volume Claim has the same storageClassName as the persistentVolume you had previously created.
kind: PersistentVolumeapiVersion: v1metadata: name:
spec:
accessModes: - ReadWriteMany
requests: storage: 2Gi
storageClassName: shared
2. Save and create the pvc
njerry191@cloudshell:~ (extreme-clone-2654111)$ kubect1 create -f app-data.yaml persistentvolumeclaim/app-data created
3. View the pvc
Image for post
4. Let's see what has changed in the pv we had initially created.
Image for post
Our status has now changed from available to bound.
5. Create a new pod named myapp with image nginx that will be used to Mount the Persistent Volume Claim with the path /var/app/config.
Mounting a Claim
apiVersion: v1kind: Podmetadata: creationTimestamp: null name: app-dataspec: volumes: - name:congigpvc persistenVolumeClaim: claimName: app-data containers: - image: nginx name: app volumeMounts: - mountPath: "/srv/app-data " name: configpvc
NEW QUESTION # 57
You have a Deployment named 'web-app' running 3 replicas of a web server. You need to define a PodDisruptionBudget (PDB) that ensures at least 2 replicas of the 'web-app' are always available during a planned or unplanned disruption. Write the YAML definition for the PDB and explain how it helps to ensure availability.
Answer:
Explanation:
See the solution below with Step by Step Explanation.
Explanation:
Solution (Step by Step) :
1. PDB YAML Definition:
2. Explanation: - 'apiVersion: policy/vl Specifies the API version for the PodDisruptionBudget resource. - 'kind: PodDisruptionBudget': Specifies the type of resource, which is a PodDisruptionBudget. - 'metadata.name: web-app-pdb': Sets the name of the PDB. - 'spec.selector.matchLabels: app: web-app': This selector targets the Pods labeled with 'app: web-app' , ensuring the PDB applies to the 'web-app' Deployment's Pods. - 'spec.minAvailable: 2: Specifies the minimum number of Pods (replicas) that must remain available during a disruption. In this case, at least 2 replicas of 'web-app' must be running. 3. How it ensures availability: - Planned Disruptions: If you need to perform a maintenance operation that requires taking down a Pod, the Kubernetes scheduler will not allow it if doing so would violate the PDB. For example, if you try to delete a Pod belonging to 'web-app' , the scheduler will prevent it because deleting it would reduce the available replicas below the 'minAvailable' threshold. - Unplanned Disruptions: In case of node failures, the PDB helps to protect the application by ensuring that the minimum required number of Pods remain running on other healthy nodes. 4. Implementation: - Apply the YAML using 'kubectl apply -f web-app-pdb.yamr 5. Verification: You can verify the PDB's effectiveness by trying to delete Pods or simulate a node failure. You should observe that the scheduler prevents actions that would violate the 'minAvailable' constraint.
NEW QUESTION # 58
List all persistent volumes sorted by capacity, saving the full kubectl output to
/opt/KUCC00102/volume_list. Use kubectl 's own functionality for sorting the output, and do not manipulate it any further.
Answer:
Explanation:
See the solution below.
Explanation
solution
F:\Work\Data Entry Work\Data Entry\20200827\CKA\2 C.JPG
NEW QUESTION # 59
Score: 4%
Context
You have been asked to create a new ClusterRole for a deployment pipeline and bind it to a specific ServiceAccount scoped to a specific namespace.
Task
Create a new ClusterRole named deployment-clusterrole, which only allows to create the following resource types:
* Deployment
* StatefulSet
* DaemonSet
Create a new ServiceAccount named cicd-token in the existing namespace app-team1.
Bind the new ClusterRole deployment-clusterrole lo the new ServiceAccount cicd-token , limited to the namespace app-team1.
Answer:
Explanation:
Solution:
Task should be complete on node k8s -1 master, 2 worker for this connect use command
[student@node-1] > ssh k8s
kubectl create clusterrole deployment-clusterrole --verb=create --resource=deployments,statefulsets,daemonsets kubectl create serviceaccount cicd-token --namespace=app-team1 kubectl create rolebinding deployment-clusterrole --clusterrole=deployment-clusterrole --serviceaccount=default:cicd-token --namespace=app-team1
NEW QUESTION # 60
You have a deployment that runs multiple replicas of a web server application. You need to ensure that the Deployment always maintains at least 2 replicas available, even if one or more pods are deleted or become unavailable. How can you configure the Deployment to achieve this using the 'maxUnavailable' field in the 'strategy.rollingUpdate' section?
Answer:
Explanation:
See the solution below with Step by Step Explanation.
Explanation:
Solution (Step by Step) :
1. Define the Deployment with maxUnavailable': Define a Deployment YAML file with 'replicas: 3', indicating that you want three replicas of the web server application. Then, in the 'strategy.rollinglJpdate' section, set the 'maxUnavailable' field to '1'.
2. Apply the Deployment: Apply the YAML file to your cluster using 'kubectl apply -f my-web-server.yamr. The deployment will create three replicas of your web server application. 3. Test the 'maxUnavailable' Configuration: Delete or terminate one of the pods in the Deployment. The Deployment will automatically create a new pod to replace the deleted or unavailable one, ensuring that at least two replicas are always available. You can monitor the status of the deployment using 'kubectl get pods -l app=my-web-server'. You should see that two pods are consistently running, while the third is being replaced.
NEW QUESTION # 61
Get list of PVs and order by size and write to file - /opt/pvlist.txt
Answer:
Explanation:
kubectl get pv --sort-by=.spec.capacity.storage > /opt/pvlist.txt
NEW QUESTION # 62
Create a pod as follows:
* Name: mongo
* Using Image: mongo
* In a new Kubernetes namespace named
Answer:
Explanation:
See the solution below.
Explanation
solution
NEW QUESTION # 63
A bootstrap USB flash drive has been prepared using a Linux workstation to load the initial configuration of a Palo Alto Networks firewall. The USB flash drive was formatted using file system ntfs and the initial configuration is stored in a file named init-cfg.txt.
The contents of Init-cfg.txt in the USB flash drive are as follows:
type=static
ip-address=10.5.107.19
default-gateway=10.5.107.1
netmask=255.255.255.0
Ipv6-address=2001:400:100::1/64
ipv6-default-gateway=2001:400:100::2
hostname=Ca-FW-DC1
panorama-server=10.5.107.20
panorama-server-2=10.5.107.21
tplname=FINANCE TG4
dgname=finance_dg
dns-primary=10.5.6.6
op-command-modes multi-vsys.jumbo-frame
dhcp-send-hostname=no
dhcp-send-client-id=no
dhcp-accept-server-hostname=no
dhcp-accept-server-domain=no
The USB flash drive has been inserted in the firewalls' USB port, and the firewall has been powered on.Upon boot, the firewall fails to begin the bootstrapping process. The failure is caused because:
- A. The bootstrap.xml file is a required file, but it is missing
- B. The USB must be formatted using the ext4 file system
- C. There must be commas between the parameter names and their values instead of the equal symbols
- D. The USB drive has been formatted with an unsupported file system
- E. nit-cfg bit is an incorrect filename the correct filename should be init-ofg.xml
Answer: B
NEW QUESTION # 64
A recent deployment of a new version of your application caused a large number of pods to enter a 'CrashLoopBackOff state. You need to identify the root cause of the issue and resolve it.
Answer:
Explanation:
See the solution below with Step by Step Explanation.
Explanation:
Solution (Step by Step) :
1. Identify the Failing Pods:
- Use 'kubectl get pods -l app=' to list the pods in the Deployment.
- Identify the pods that are in the 'CrashLoopBackOff state.
2. Examine Pod Logs:
- Use 'kubectl logs -f to view the logs of the failing pods.
- Look for error messages, stack traces, or other clues that can point to the root cause of the crash.
- For example, errors related to:
- Missing dependencies or configuration: Check if the application is missing required configuration files or dependencies.
- Incorrect resource usage: Look for errors related to memory or CPU limitations.
- Network connectivity issues: Check for errors related to communication failures.
3. Check for Recent Changes:
- Review the changes made during the deployment:
- Analyze the updated deployment YAML file to identify any configuration changes that might have introduced the crash.
- Check for changes in container images, resource requests, or other settings.
4. Inspect Deployment Events:
- Use "kubectl describe pod ' to view the pod's events:
- Look for events related to the crash, such as "Back-off restarting failed container" or "Container restarting".
- The events might provide insights into the timing of the crashes and the potential reasons.
5. Verify Network Connectivity:
- Test network connectivity from within the failing pods:
- Use "kubectl exec -it -n bash' to enter a pod.
- Run 'ping or 'curl to test network connectivity to external resources.
6. Troubleshoot the Application Code:
- If the logs suggest a problem with the application code:
- Debug the application code: Analyze the code to find the source of the crashes.
- Consider rolling back the deployment to the previous version: Use 'kubectl rollout undo deployment ' to revert to the previous working version.
7. Address the Root Cause:
- Once you identify the root cause:
- Fix the underlying issue in the application code or deployment configuration.
- Apply the fixes: Update the deployment YAML file with the corrected configuration.
- Redeploy the application: Use "kubectl apply -f to redeploy the application with the fix.
NEW QUESTION # 65
......
Download the Latest CKA Dump - 2025 CKA Exam Question Bank: https://www.testpassed.com/CKA-still-valid-exam.html
Buy Latest CKA Exam Q&A PDF - One Year Free Update: https://drive.google.com/open?id=1u6OWpilAKaSjnt3mq8tmCFb47KB-2Gz9